Try/Catch
By: Paul Pasko, Customer Technical Training Sr. Advisor
Overview:
This step is part of the Advanced Workflow and is therefore available only in the Professional and Enterprise Editions of Dell Boomi AtomSphere. Please contact a Dell Boomi Sales Representative for more information.
The Try/Catch step captures document-level errors for one or more documents that fail during an execution. The Try/Catch step must be placed BEFORE the main processing steps in your process. The Try/Catch step sends documents down the "Try" path to be processed. Documents that fail are caught and are sent down the "Catch" path.
This logic feature allows you to design advanced logging and processing for failed documents because these original documents and properties are sent down the "Catch" path. You can also capture the exception logged within the original path and include it in your messaging via a parameter reference to a document property. The goal of the Try/Catch step is to prevent process-level failures in the event that a document fails so that you can act upon it later in your process flow.
The following errors will be captured:
- Connectors that log errors for specific documents when errors occur (e.g., socket timeouts, connection refused)
- An Exception step that has the Stop Single Document check box turned on
- A Map step if it does not produce any output, generates a validation error or generates a connector error.
The following errors will NOT be captured:
- Null pointer exceptions and similar process-level errors
- An Exception step that has the Stop Single Document check box turned off
Connectors that cause a full exception error to be thrown back to the process instead of capturing the error internally and logging it per document.
Retry Properties:
When adding a Try/Catch step to the canvas, you’ll need to configure a Retry Count:

The Retry Count is a numeric value (from 0 to 5) that defines the number of times a failed document will be retried through the main series of steps AFTER the Try/Catch step. The Retry Count option will pause between retries.
0 = No retry
1 = Immediate
2 = Wait time is 10 seconds
3 = Wait time is 20 seconds
4 = Wait time is 30 seconds
5 = Wait time is 60 seconds
As you can see, documents will only be retried up to 5 times (per process execution) within a total span of a few minutes. This is useful if say there’s a sporadic connectivity issue with an endpoint connector which fails the first time but may succeed through the next attempt.
What if the document ultimately fails through all retry attempts? It may be extremely useful to corral these failed documents so that they can be acted upon later. For example, what if your process was picking up orders from an online shopping cart and 9 of the 10 orders were processed successfully. Wouldn’t you want to know why the 1 failed order was not processed and be able to take action to see that order through to successful processing?
This is an advantage to using the Try/Catch step. Using the Try/Catch in conjunction with other steps (Message & Notify) can help make your processes more efficient by not only tracking and logging the reasons for failed documents, but by also referencing those failures to specific profile elements within each failed document.
Use Case Walkthrough:
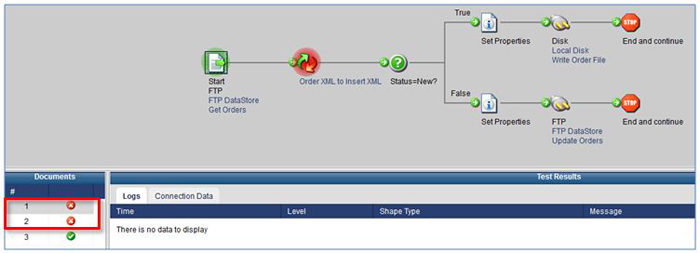
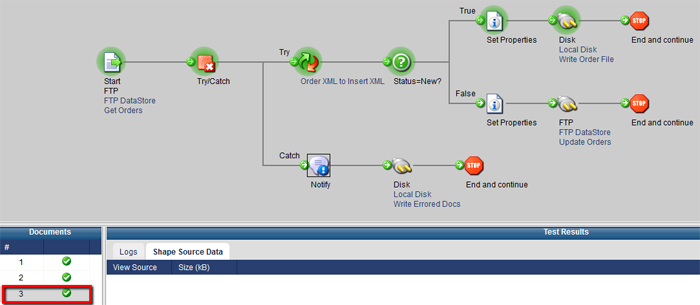
Let’s take a look at a sample use case for utilizing the Try/Catch step. We’ll highlight a sample process as shown below. The goal of this process is to pick up orders and then route those orders accordingly, depending on status type.

If we run this process in Test Mode, we can see that 2 of the 3 documents failed. Although we can view the errors reported within the document logs, if this process was in production, those documents would be lost.
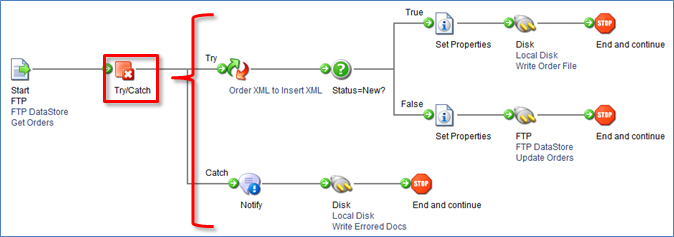
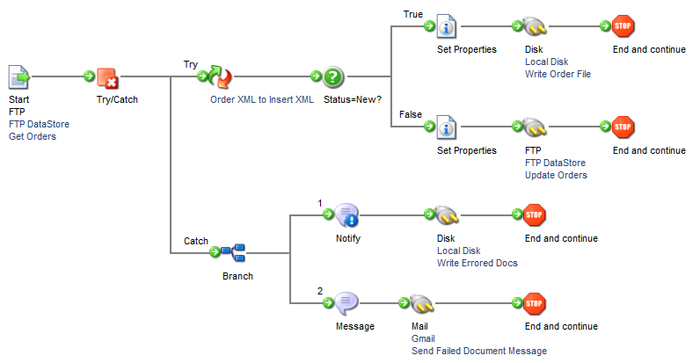
Let’s now approach that process utilizing the Try/Catch step. Again, the goal of this process is to pick up orders and then route those orders accordingly, depending on status type. Now, a Try/Catch step was placed immediately after the Start step so to “catch” any document that results in error throughout the main portion of the process flow. Detailed error messages are then configured for each failed document (using the Notify step) and all failed documents are written to Disk so that they can be acted upon later.
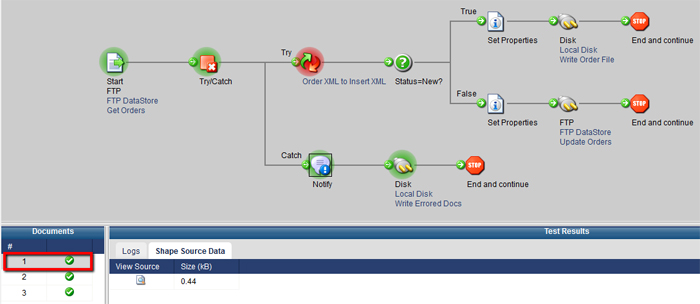
When running the Process in Test Mode, notice how the 1st document fails at the Map step. This document is then captured via the Try/Catch and then routed down the ‘Catch’ path. The Notify step is configured to capture this unique error message for more detailed process reporting. Then, the document is written to an output source so it can be acted upon later.
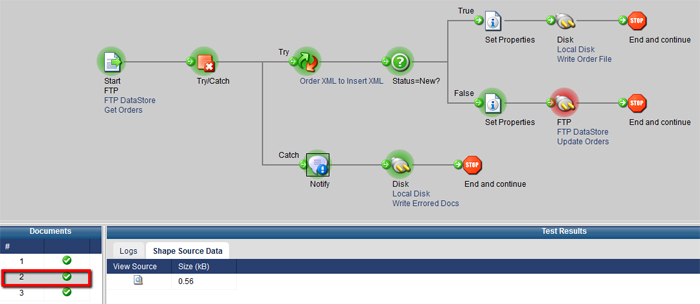
Notice how the 2nd document fails at the FTP Connector step. This document is also captured via the Try/Catch, routed down the ‘Catch’ path and written to an output source so it can be acted upon later.
Notice how the 3rd document is successful and thus flows down the ‘Try’ path to completion.
We can think about how we could expand this process to not only store these failed documents, but to also perhaps email an administrator that certain records failed to process. That way, someone would be notified that failed documents exist and they need to be acted upon. We can use the Mail connector in conjunction with the Message step to accomplish this.
Configuring the Use of Try/Catch Message:
The Try/Catch step generates its own built-in Document Property (Meta Information – Base – Try/Catch Message) which can be dynamically reference per unique failed document. In the above example, we used the Notify (& Message) step to log detailed error messages.
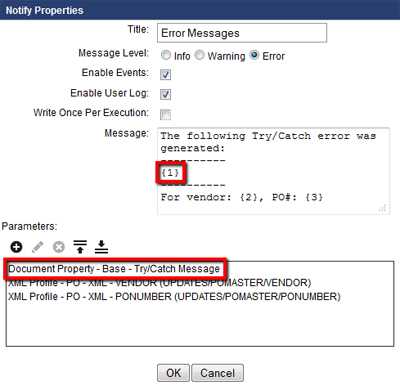
Note how this error message is displayed:

Put It Into Play:
Think of where you may be able to utilize the Try/Catch step within your own processes and start taking advantage it!